MIDI Elements Teensy Library
I have created a wrapper library to make programming MIDI controllers on the Teensy board dead easy and super fast. Simply instantiate object for each component like Buttons, Potentiometer, LED, rotary encoders, etc. and let the library handle all the dirty work of reading the raw values and deciding when to send MIDI signals. Enabling you to experiment and concentrate on your creative ideas and not waste too much time with the repetitive technical details and debugging code.
Just in a couple lines of code you can program a fully functioning MIDI controller.
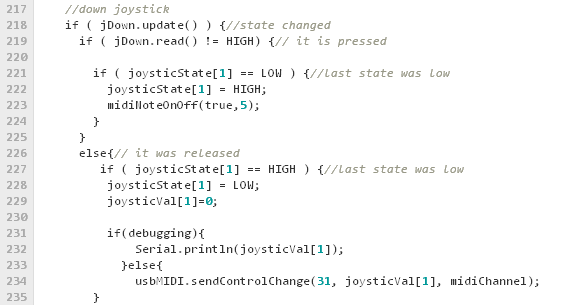
Here’s an example of how simple things are:
boolean debug=false; // print to serial instead of midi
boolean secondary=true; // enable secondary midi messages
int midiChannel=1; // midi channel number
// declare all your components here
Button but(17,midiChannel,1,secondary,debug); // button 1 on pin 17
Button but2(16,midiChannel,2,secondary,debug); // button 2 on pin 16
Potentiometer pot(45,midiChannel,3,secondary,debug); // knob on pin 45 (A7)
Led led(15,midiChannel,3,true); // led on pin 15 with PWM enabled, triggered on the same number as pot
void setup(){
usbMIDI.setHandleControlChange(OnControlChange); // set event handler for CC
}
void loop(){
// add here all the input component reads
pot.read(); // read knob and send midi messages
but.read(); // read buttons and send midi messages
but2.read();
usbMIDI.read(); // read all the incoming midi messages
}
//====================================================================
// event handlers
void OnControlChange(byte channel, byte control, byte value){
// add all your output component sets that will trigger with cc
led.setOn(channel,control,value);
}
Currently only Buttons, Potentiometers and LEDs are supported. But I’m planning on adding RGB LED, rotary encoder, LED bars and ring and button pad classes.
Each component sends two sets of MIDI signals if enabled. For example Buttons send NoteOn, NoteOff, as well as ControlChange values so that they could be easily mapped in Toggle or Instant mode in software like Ableton Live. Also the Potentiometers send secondary NoteOns when values reach 0 or 127, à la MIDI Fighter Pro.
Download: github
To install extract the MIDIElements folder in your arduino/libraries directory
Aftertouch MIDI Glove
It’s been a while since I posted a new project here, but after the Moving Silence festival I got so fascinated, inspired and charged with this creative energy that shortly after I just knew exactly what I was going to do.
At first it occurred to me that so far I’ve been working on mostly controllers but not something as expressive as an instrument on its own. I really got inspired by Shingo Inao and Onyx Ashanti and their devices. I wanted to use my body and movement to produce or effect the sounds, but still be able to use that hand for my usual controllerism routine. That’s when the glove idea came in.
Effects would be triggered by pressing buttons on the glove and tilting it, this way the user is able to precisely control which effect he wants to trigger. Also I wanted to somehow trigger samples from it, by making a big sudden move with my hand. I also light feedback with colors and intensity that would be directly related to the intensity of the effects would be great. I believe that its very important when the audience can relate visual elements, big movements, lighting and color to what they are hearing.
So I began working on this idea by taking apart my old useless controller, I needed the accelerometer and IR proximity sensor inside. It took literally just a few hours to put everything together and start working on the code. I graphed all the values from the sensors and tried to find what kind of data and movements would make more sense for this project. Also I had to smooth out all the readings to get rid of the sudden irregular movements. I ended up using the rate of change looking for sudden accelerations for triggering samples, and constraining some values that would be used for tilt tracking.
The buttons are a bit small and uncomfortable to press all the time, so I’ve put a small piece of cardboard underneath the board to lift it higher, also sew in square pieces of cardboard over the push witches, though they slide out of the way and require readjustment. Still have to work on improving this. If you have any ideas pleas let me know in the comments
I highly believe that such technology should be free and the only way forward is to collectively contribute in its development and innovation. So you are highly encouraged, almost expected, to re use this code, improve it, and share it
As I mentioned above, building it is fairly easy and cheap. Here are all the parts I used.
1 x pair of cycling gloves €10(?)
1 x Teensy 3 €15
1 x ADXL335 Accelerometer €20
1 x Infrared Proximity Sensor €12
4 x Mini Push Buttons €1.20
1 x Common Anode RGB LED €1.5
3 x Resistors €0.60
+ bunch of Wires
Very roughly all the parts for this cost around 60 euros.
This is the diagram of how I wired everything up (note that I used a Teensy 3 microcontroller and the pins are a bit different)
And you can find all the source code here: github
look ma, no Ableton
I finally got around to start using openFrameworks, and thought it would be a good chance to make some stand alone and lightweight application for using with my grid controller. Usually the laptop I use for demonstrations can’t handle Ableton. So here is a first implementation of a very basic step sequencer for 8 samples and 8 steps.
MF3D Ableton Mapping
So I finally received my prize from DJ Techtools! And its an AMAZING controller, the MIDI Fighter 3D. A 4×4 RGB arcade button controller, with 4 banks, 6 side buttons and very responsive tilt sensor and compass! Literally packed with different MIDI messages for the most expressive controllerism!
I’m so excited about it that I decided to port my MF Pro Ableton script for this guy. All I had to do was implement the correct LED feedback messages, re arrange some button assignments and implement the tempo blink and master VU meter.
Here is a beautiful live performance from Rheyne featuring the script.
It also got featured at the DJ Tech Tools website!

The mapping consits of 4 pages.
Page 1: is the General control page and consists of tempo controls, global play, stop and record and the controls to move around the “red box”
Page 2: is the Clip control page, you have a 4×3 grid and the top row is the stop button for each track.
Page 3: is the Track control page. Each row corresponds to one of the rows inside of the red box. And it consits of Track select, Mut, Arm and Solo.
Page 4: is the Drum Rack page. It plays the highlighted 4×4 grid in the drum rack. Make sure that the drum track is Armed and the Track input is On in the Midi preferences page.
Also the tilt Left|Right|Front|Back messages get automatically mapped to the first effect device of the selected track.
A lot of this code was inspired by and “borrowed” from Hanz Petrov, Will Marshall and the Livid Framework. Without them this wouldn’t exist.
Download at: http://maps.djtechtools.com/mappings/664


